Can I just start this post by saying that I have absolutely no qualifications to guide anyone with regards to blogging! Whatever I have found out in the last 10+ months has been through asking members of my Blogily, and kind readers helping me out.
So, when the opportunity comes to help another, I am more than happy to try and pass on a gem or two of wisdom, if it helps!
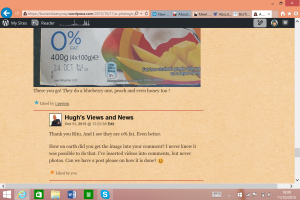
Today, in my post about breakfast, Hugh, the reason for the post, was mystified as to how I managed to put an image into my comments! Then my lovely blog sis Judy also piped up that she would love to know how to do that too!
A polite request of a post with instructions from Hugh means I am here typing away!
Actually there is a bit of history to how I finally worked out one way to actually do this. I was as intrigued as Hugh and Judy a few months ago, seeing comments on my posts with images and gifs. My other Blog Sis Erika and I tried with no luck for ages to learn. We had help from many, but it just wasn’t working.
All we were being told was to find a picture and just use the URL… Copy and paste it into the comments section, and it would work… but it didn’t! There were many comments we were sending that would just show a jumble of letters, and URLs, but no image.
Then I got a pearl of wisdom from the Leibster Meister himself, Rib Rob of The V-Pub. It was possibly not the easiest way, but hey, it worked for us, and even though I don’t use it often, it is good to know!
So… basically the way I do this mega complex insertion of image into comments is…
… upload the image you wish to use in the comments to the WP Media album.
Then once there, get the details up of the image you want, and you will see an image URL box.
Here is a screen shot of the website Media view.
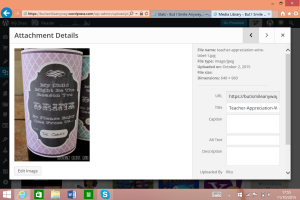 The image URL is the first box.
Or if you use Android, the screen looks like so…
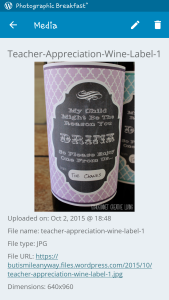 The URL is already highlighted.
Copy the URL and paste into the comment section, and this is the important bit!
Click into the URL text and remove the ‘s’ from the ‘https’ part of the URL at the beginning.
Then go ahead and press ‘send’, et voila! your image should appear in the comments section!
Go ahead and try it in the comments below, and we shall see if I am any good as an IT teacher, or whether I should just stick to Nursery teaching and smiling!
As I said before, there is probably much easier ways to do this, and if any of you wonderful Peeps know, be sure to share! But hey, it works, and if you are not technically minded, (that’ll be me then!), this is a fool proof way!
I hope it helps!

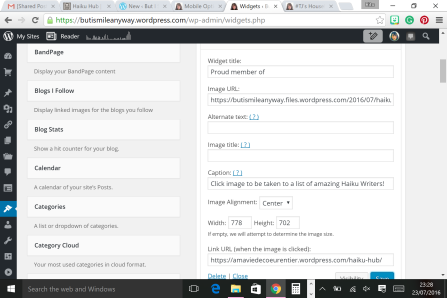
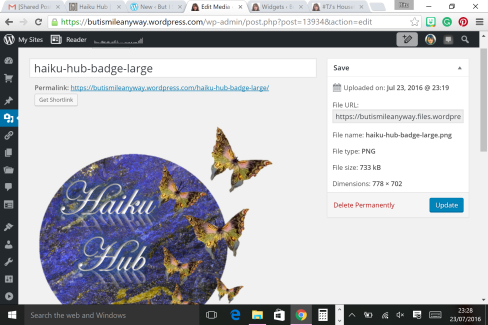


Photo-fy Your Comments!
11 Oct 2015 70 Comments
by Ritu in Thoughts Opinions & Memories Tags: Advice, Blog, Blog Post, Blog Tips, Blogger, Blogging, Help, Images in Comments
Can I just start this post by saying that I have absolutely no qualifications to guide anyone with regards to blogging! Whatever I have found out in the last 10+ months has been through asking members of my Blogily, and kind readers helping me out.
So, when the opportunity comes to help another, I am more than happy to try and pass on a gem or two of wisdom, if it helps!
Today, in my post about breakfast, Hugh, the reason for the post, was mystified as to how I managed to put an image into my comments! Then my lovely blog sis Judy also piped up that she would love to know how to do that too!
A polite request of a post with instructions from Hugh means I am here typing away!
Actually there is a bit of history to how I finally worked out one way to actually do this. I was as intrigued as Hugh and Judy a few months ago, seeing comments on my posts with images and gifs. My other Blog Sis Erika and I tried with no luck for ages to learn. We had help from many, but it just wasn’t working.
All we were being told was to find a picture and just use the URL… Copy and paste it into the comments section, and it would work… but it didn’t! There were many comments we were sending that would just show a jumble of letters, and URLs, but no image.
Then I got a pearl of wisdom from the Leibster Meister himself, Rib Rob of The V-Pub. It was possibly not the easiest way, but hey, it worked for us, and even though I don’t use it often, it is good to know!
So… basically the way I do this mega complex insertion of image into comments is…
… upload the image you wish to use in the comments to the WP Media album.
Then once there, get the details up of the image you want, and you will see an image URL box.
Here is a screen shot of the website Media view.
Or if you use Android, the screen looks like so…
Copy the URL and paste into the comment section, and this is the important bit!
Click into the URL text and remove the ‘s’ from the ‘https’ part of the URL at the beginning.
Then go ahead and press ‘send’, et voila! your image should appear in the comments section!
Go ahead and try it in the comments below, and we shall see if I am any good as an IT teacher, or whether I should just stick to Nursery teaching and smiling!
As I said before, there is probably much easier ways to do this, and if any of you wonderful Peeps know, be sure to share! But hey, it works, and if you are not technically minded, (that’ll be me then!), this is a fool proof way!
I hope it helps!
Share the love 💜